Here is our favorite little friend, Nellie, once again.
Like our other friend, Peighton, she "only wears dresses."
Good thing Peighton's mommy can whip one up in no time!
Making clothes for the American Girl dolls is pretty simple and most importatly QUICK!
This dress is no exception-perfect for a beginner and for sure a child learning to sew could help with as well.
I think this will be one of the first things I help Peighton make....in a few years, she's not so good with real scissors yet!
The dress in the first picture and the one I made below both came out of my scrap box too, so it's a great way to use up random cute scraps!
SUPPLIES
1/4 yard for the skirt
scraps for the chest
scraps of ribbon for the straps
1/8 yard for the bottom of the skirt
Scraps of white/plain fabric for the chest lining
About 8" of velcro (snaps could also be used)
Like I said, most of this can come out of scraps, but you may need to buy a fat quarter for the skirt.
Or, it's always fun to take a child to the fabric store and let them design it themselves...Peighton usually just gets to go to my scraps!
Although she did pick out the bunny fabric below.
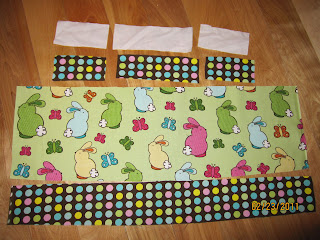
Cut the following:
Front chest piece: Cut one 2" x 6 1/2" (also cut the same out of your lining fabric)
Back chest piece: Cut two 2" x 4" (also cut the same out of your lining fabric)
Skirt: cut one 7" x 22"
Straps: cut two 5" pieces of ribbon
OR you can cut two pieces of fabric 2" x 5" for the straps also.
Bottom Band of the skirt: cut one 3" x 22"
Your pieces should look like this now:
First, lay your two back chest pieces right sides together along with the lining pieces.
Cut a small quarter circle out of ONE corner-this will be the armpit part.
If you need to trace something a cup/glass works well.
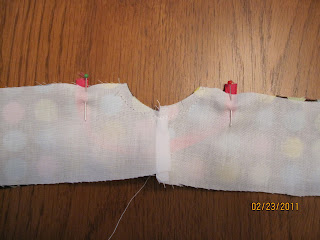
Next, fold your front chest piece in half (and the lining) and do the same.
They should look like this:
When laid end to end, you should have what looks like 2 half circles, where the arms will go.
Now, take pieces of the pieces of your "pretty" fabric and put them right sides together.
Pin and sew the left and right sides.
Do the same for the lining.
Press the seams open when done.
Lay the pretty fabric and the lining on top of each other and sew the underarm part.
It's the part that looks like a half circle.
It's the part that looks like a half circle.
Now pin the straps in place.
Pin them about an inch in from the corner.
Make sure to not twist the strap as you are pinning.
Sew along the side, top and down the other side of the chest pieces.
Turn right side out and press, as well as gently poking out your corners.
Then topstitch.
You don't have to topstitch but it makes it look a lot nicer when finished!
Next, attach the skirt band to the skirt.
Place right sides together and pin.
Sew them together, and then zig zag the seam or use a serger to finish it.
Press and then topstitch if you want to.
Now, hem the bottom of the skirt.
Press up 1/4" and then 1/4" again.
Sew.
Now fold in the sides of your skirt piece.
Fold over and press 1/4" and then 1/4" again.
Sew this down.
Next, you need to do a gathering stitch at the top of the skirt piece.
Then lay the chest part on top of the skirt (right sides together) and pull your gathering threads until they are about the same width.
Pin along the entire width of it.
Then sew it down.
Serge or zig zag this seam.
When you turn it over it should look almost done!
Attach the velcro.
I cut a 1 1/2" strip for the chest part and then a 6" piece for the skirt part.
You could also use snaps here or buttons or whatever you choose!
Now try it on Nellie/Julie/Samantha, etc and see your little girl's eyes light up!
Peighton's sure did-she has a bunny dress to match which always makes her smile!
The dress Nellie is wearing in the first picture of this post has a little flower rosette on it.
It's super quick to make and gives a nice detail to any dress!
Watch for that tutorial to come-mostly because I didn't take pictures this time!


Great tutorial. Thanks for sharing! Peighton is adorable, and Nellie is too.
ReplyDeleteThank you! Just led my 8-yo daughter through this tutorial and it turned out lovely. We used a snap instead of velcro.
ReplyDeleteLove the fact that you add the measurements too .Very pretty.Thanks.
ReplyDeletePretty dress and great tutorial.. Beautiful daughter. Thanks for the tutorial, will be making this asap.
ReplyDeleteThank you so much for the measurements. God Bless you
ReplyDelete